Sunday, August 16, 2009

Blast from my Past - Buttermilk Cupcakes

Buttermilk Cupcakes 7
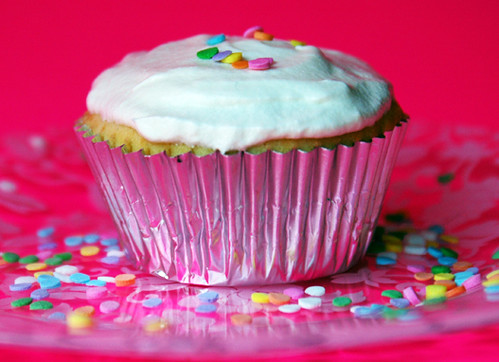
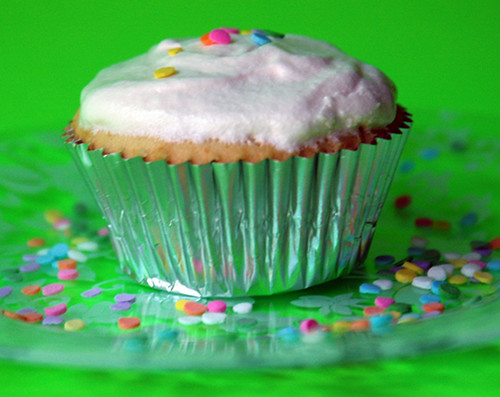
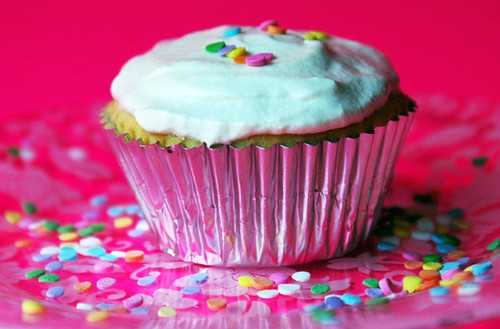
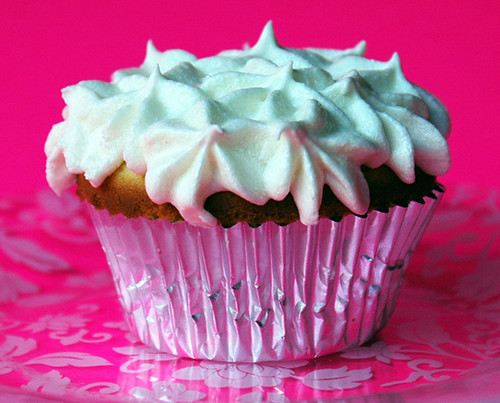
As a kind of homage to my past, I decided to make yellow buttermilk cupcakes with cream cheese frosting. You see the first thing I ever baked, from scratch that is, was a batch of buttermilk cupcakes with cream cheese frosting. I can't tell you what made me want to bake them or why I thought they would be good. I remember seeing the recipe for the cupcakes in the back of a magazine, although I am not sure which one.

I remember buying all the ingredients because before then, we really did not have lots of baking goods. We had some old flour, and a small amount of sugar. And when the recipe called for cake flour as well, we kind of had no idea what that was.We didn't even really keep milk in the house (no one really liked to drink it). We had to buy baking powder and soda, and I used years old vanilla extract. Before those cupcakes, we weren't really a baking family. Sure my dad and mom cooked a lot, and very well I might add, but baking was not something either one of them really did, and if we did have some baked goods it probably came from Pillsbury, Betty Crocker or Duncan-Hines.
Buttermilk Cupcakes 3
I got out our old, old stand mixer from the mid 80s that had a semi-broken beater and kind of sounded like it was dying when it was on. I combined the ingredients, although I had no idea about all the little things like how to measure them out correctly. I didn't even own any dry measuring cups, and instead found an ancient 1/4 cup measure that I used. I had no measuring spoons either and so I just used this old one I found at the back of our junk drawer. I didn't know to bring the eggs to room temperature or how to actually soften butter. I didn't know what 2/3 full meant when filling cupcakes. However, when it came to the timing it was like something just clicked. I got them out when they were exactly perfect, just knowing to check even when the timer said an extra 5 minutes.

Even being an extreme baking novice at the time, they still magically managed to turn out OK. Actually, better than OK, they were delicious. When my family told me how great they were, I felt really proud because it was all my work and it was all from scratch. I wouldn't say that it was like a light bulb moment and I immediately loved baking, but it showed me I could do it.

Over that first year I baked periodically. I had some disasters-like the homemade pumpkin cookies that when I went to cut the batch in half, I cut everything else but the flour and salt so the cookies were kind of salty. Slowly over that year, I started acquiring baking utensils like pans, measuring cups and extracts.
Buttermilk Cupcakes 4
It wasn't until about a year ago I really got into baking. I started baking more and more often, although I usually stuck to cupcakes and cookies. When school started last year, I brought my goods to school. People really like my stuff, and that encouraged me to bake more. One kid offered to buy my baked goods! Pretty soon I had a hand mixer and could bake more things. I tried my hand at royal icing at Halloween for the first time, which was a big step for me. I started reading baking blogs and that gave me a lot of inspiration. Finally in April, I started one of my own. This blog gave me the excuse to try different things and my passion for baking really exploded.

Now I have come full-circle exploring the very first thing I baked, again. I am not using the same recipe as I have lost the article, but from what I can recollect it is a very similar recipe. I am frosting it in cream-cheese for the same nostalgic flavor.

Speaking on a kind of unrelated note, I was arguing my friend about something concerning cupcakes. Is a cupcake the entire package including the cake and frosting or just simply the cake. Do you say buttermilk cake and cream-cheese frosting cupcakes or do you say buttermilk cupcakes with cream-cheese frosting as two separate entities? I think a cupcake is in theory the entire package including the frosting but in a sentence it usually refers to just the cake. I don't know guys... What do you think? Leave it in a comment, if you like.

I got this recipe from Martha Stewart's Cupcakes. This will be the first recipe I try from the book, but I have used Martha Stewarts recipes for cupcakes before. The buttermilk doesn't really do anything different for the flavor that is noticeable but what it does to the texture is amazing. It makes the cake tender, and combined with the cake flour makes for an incredibly light and fluffy cake, while the all purpose flour keeps it from being too tender that it falls apart.
Buttermilk Cupcakes 5
These cupcakes are a slight twist on the standard yellow cake-vanilla buttercream icing combo, but could work in any situation where you would normally use that, a birthday party, after dinner treat or at a picnic. Then again, some people aren't a fan of cream-cheese frosting (like my dad) but also some people don't like vanilla buttercream either (like me) so you never can please everyone! :)
Buttermilk Cupcakes 6
Yellow Buttermilk Cupcakes
Adapted from Martha Stewart's Cupcakes
Makes 36 standard cupcakes (you could cut this in half for less cupcakes but be warned it calls for 5 eggs)

3 cups cake flour, like Soft-as-Silk. It is usually in a cereal-box sized box, not a bag!
1 1/2 cups all-purpose flour
3/4 teaspoons baking soda
2 1/4 teaspoons baking powder
1 1/2 teaspoons salt
1 1/8 cups butter (2 and 1/4 sticks) unsalted butter
2 1/4 cups sugar
5 whole eggs
3 egg yolks
2 cups buttermilk
1 tablespoon vanilla


  1. Preheat oven to 350 degrees farhenheit.Line standard muffin cups with paper liners.

  2. Sift together all dry ingredients, excluding sugar, into a medium bowl.

  3. With a mixer on med-high speed, cream butter and sugar until more pale in color. Reduce speed and add whole eggs, one at a time, beating until smooth. Add egg yolks and beat until combined.

  4. Reduce speed to low or off. (Trust me you want to do this very low, it seems like an amateur mistake but not thinking I made it and flour went everywhere!) Add the sifted mixture in three batches, alternating with two batches of butter milk. (Basically like flour-buttermilk-flour-buttermilk-flour, but you probably didn't need me to reiterate that.) Beat until combined after each addition. Stir in vanilla.

  5. Divide between the muffin cups, filling 3/4 full. (These do not rise a whole lot, but they do rise.)

  6. Bake for around 20 minutes, or until a toothpick inserted in the center comes out clean.

  7. Once cool spread with frosting (recipe below).

Cream Cheese Frosting
Adapted from Martha Stewart Cupcakes
Makes 4 cups (Plenty to generously frost all 36 cupcakes)


2 sticks unsalted butter
12 ounces (1 1/2 8oz packages) cream cheese
1 pound (4 cups) powdered sugar
1 teaspoon vanilla


1.With a mixer on med-high speed, beat butter and cream cheese until very fluffy, around 3 minutes
2.Reduce speed to low or off and add sugar in eight increments. Scrape down bowl after each increment.
3.Once combined, add vanilla and mix until smooth.

Buttermilk Cupcakes 2

----------------------------------------------------------------------------------------------------
Hey guys, and gals too! I just wanted to say I have some really great dishes coming up as well as something really special right before my school hiatus! I got my logo up and formatted the colors. I think it looks a little bit more professional and streamlined and elegant and that is really want I am trying to convey. Hopefully it can help take this blog to new levels. Once again, thank you guys for reading. It really means the world to me!
:)
Shannon

Saturday, August 08, 2009

Incredi-Cake! Kentucky Butter Cake

Kentucky Butter Cake 3
This cake is, as declared by my friends and family, probably the best thing I have ever made. It has the perfect balance of sweetness, moistness and tenderness. Its perfect, even without fancy frosting, fillings, or decorations. Its simple and sophisticated with just a dusting of powdered sugar. The recipe calls the cake Kentucky Butter Cake. I call it delicious.

It is a pretty simple cake. It has more ingredients than a pound cake but I would call the textures very similar, although the Kentucky cake is less dense but is more rich, if that makes sense. It has buttermilk in the batter, but I have also seen sour cream exchanged for a one to one ratio, although I have not tried it that way. Personally, I love what the flavor of buttermilk does to a cake as well as how tender it makes it, so if I find a buttermilk cake recipe I tend to use it. There is no discernible 'twang' of the buttermilk when all is done, so just because it smells like sour milk that's thickened in the jar, it won't be like that in the baked good. Also just a reminder, if your out of buttermilk or can't find it, add one tablespoon of lemon juice, or white vinegar, to a measuring cup and fill in with milk to get one cup. Wait 10 minutes and it will be thoroughly sour and thus can make a substitute for buttermilk. Speaking of not being able to find it, I went to 3 grocery stores and could not find it. When I went to 4th grocery store they had 3 different brands of it, go figure you know!
Kentucky Butter Cake 3
The glaze that gets sucked down by the cake is basically butter and sugar. When you melt the butter, make sure you keep the heat pretty low. You don't want brown butter, although brown butter cupcakes are pretty delicious. Sorry unrelated, I got side tracked. You just want a smooth melted butter and sugar mixture that melts the sugar smoothly. I suppose you could do it in the microwave but the microwave is so finicky when melting butter (at least mine is) that in this case, the stove top is much easier.

When the cake is a little bit cool, poke a bunch of holes with a skewer, fork, your finger, who cares. You will want to do this in your bundt or tube pan so you can flip it over and cover the holes. With a skewer you can get all the way to the bottom, or top I guess when your eating it, but I had no skewer so I went with a fork. The glaze leaves these little pockets of super moist, tender, buttery, sugary areas of goodness that are the best part. You might think all of the glaze won't suck in to the cake, but leave it for 30 minutes and it will pretty much be all gone. The cake is like a sponge, although its not like a sponge cake- I know a bit contradictory.
Kentucky Butter Cake 2
The cake is good served a little warm or chilled even. We ate it with the homemade blueberry jam I posted earlier, but a little bit of macerated berries or dulce de leche would be divine as well. This cake has such a simple flavor and texture (although it is far from boring) that it works well with anything. Try using leftovers or scraps in a trifle for a delicious picnic dessert.


Kentucky Butter Cake 4
Kentucky Butter Cake
Unknown Source
Makes a one full-size tube or bundt cake

For cake:
2 sticks butter
2 cups sugar
4 eggs
3 cups all-purpose flour
1 teaspoon baking powder
1/2 teaspoon baking soda
1 teaspoon salt
1 cup buttermilk
2 teaspoons vanilla extract

For glaze:
3/4 cup sugar
1/3 cup butter
scant 1/4 cup water
2 teaspoons vanilla extract

1. Preheat oven to 325 degrees F. Grease a 10-inch bundt or tube pan with a nonstick spray. You could also butter and flour if you have a tube pan but I would not reccommend buttering and flouring for a Bundt pan.

2. In a medium bowl, sift together the flour, baking powder, baking soda and salt. Set aside.

3. In a bowl, beat the butter and sugar for 3 minutes at medium speed.


4. Add eggs, one at a time. Continue to beat for 1 minute.

5. Alternate adding the flour mixture and buttermilk, ending with the flour.

6. Add vanilla or rum extract. Beat for 20 seconds.

7. Pour batter into prepared pan, and bake for about 60 minutes, or until a skewer comes out clean.

8. To make the glaze: In a small saucepan, combine sugar, butter, water and vanilla or rum extract. Do not boil, keep the heat on very low, just enough to melt it.

9. Poke the just out of the oven cake multiple times with a skewer, fork or finger if that's how you roll. Leave the cake in the pan. Pour all of the glaze over the entire cake, coating all holes and sides of cake

10. Let the cake cool completely, and soak up all glaze, before removing it from the pan.

11. Enjoy plain with powdered sugar or with a array of condiments like dulce de leche, chocolate sauce, macerated berries or jam.

Friday, August 07, 2009

Jammin'-Sorry, I couldn't think of a better pun title

Blueberry Jam 3
Ok. So I know I have been a bit of a bad blogger. I have neglected this blog, and really its been making me sad. I really started to miss the look of new posts every couple of days. Like I said before, AP classes are insane and I am not even in the school year yet! Well, not technically true as I am taking AP art history online right now. I just got caught up with that so I decided I would reward myself with finishing up my blog posts. I know kind of more work, but its a labor of love.

Anyways, long story short: this post was written almost a month ago! July 9th to be exact. So when I say today I don't really mean it. It's just taken me this long to find the time to get the pictures all prettied up and then on to Flickr and then on to here. So, basically, keep that in mind if something comes off weird. I also have the butter cake post on queue ready to be posted tomorrow. I want to give this one a little room at the top before I bump it down. Also I did make puff pastry, but unfortunately that post will not be coming to fruition. I made it and it just wasn't blog material, and I am not confident enough with it anyways. Instead I will be posting a recipe on Espresso Panna Cotta and some super delicious cupcakes. I promise, because you see if I take a picture of it I will be doing a post on it.

Thanks for Reading, and sticking through no updates,

Shannon

-----------------------------------------------------------------------------------------------------Blueberry Jam 4
Today I decided to make jam. And preserve it too. For anyone who isn't aware, jamming (as in the process of making jam) and preserving are NOT the same. Yes, they usually go hand in hand, but they are not one in the same. Jam making is simply cooking fruit down and thickening it, that may or may not use pectin. The different types of jam ( jelly, preserves, compotes, marmalades, jam, etc.) are determined by what part of the fruit is left in the jam (which is what we will call any thickened fruit spread).

Preserving is the act of taking the jam and putting it in sterilized containers and then processing until sterile and vacuum sealed. This makes the product (hopefully) shelf-stable and being able to open up the jar 6 months down the road, preserving that fresh fruit flavor in the middle of winter. For the speciality utensils like a jar tongs, canning funnel and lid lifter I found a pack from Ball brand that came with all the utensils except a canning rack. It was 6 dollars at Wal-Mart in their seasonal section. You could also go down to your local old-fashioned hardware store, like Ace Hardware, and find all of the utensils, jars and lids.

You can make jam, jelly or the like with out the some-what hassle of preserving and as long as you keep it in the fridge and eat it within 2-3 weeks. Of course, even if you open a preserved jar of jam, it must go in the fridge.

I chose to start with a spiced blueberry jam(and yes jam as in seedy, pulpy spread). It seems a little daunting for a first bout in jam making, but it came with a detailed video how-to that I thought would be a must for a semi-complicated process. I will link to it in the recipe.
Blueberry Jam 2
The recipe uses pectin so it is quicker to make than jam that the pectin in the fruit has to naturally develop. Also because of this, the jam retains a fresher fruit flavor. This recipe also uses frozen blueberries. I would use wild, as they are more flavorful but they can be more expensive and harder to find. I didn't use wild, and it was still delicious. The jam is just slightly spiced, and its not overwhelming. It just makes the jam have a subtle complexity.
Blueberry Jam 1
For the pectin, it is powdered. You can usually find pectin near the gelatin in the grocery store. It comes in a 1.75 oz box no matter what brand you use. And you use the whole box, no need to measure.

Spiced Blueberry Jam

Adapted from Alton Brown (My Adaptations are in Italics)

Ingredients
Preserving Hardware:
Large stockpot or canning kettle
Jar rack or cake
cooling rack (I had neither so I used a kitchen towel on the bottom, it will work in a pinch)
6 (8-ounce) Mason style preserving jars with lids and bands
Wide mouth canning funnel

Canning tongs (specially made for snatching jars in and out of very hot situations)
Large (8-ounce) ladle
Paper towels or dishtowels
Magnetized "lid-wand" or magnet tool from hardware store (optional)


Jam Hardware:
Medium-large saucepan
Wooden spoon
Hand masher

Jam Software:
2 (12-ounce) bags frozen blueberries
One (1 3/4-ounce) packet dry pectin
1/4 teaspoon nutmeg
2 tablespoons lemon juice
2 tablespoons apple cider vinegar
3 cups sugar
1/2 cup water


Directions
For the jam:

Place blueberries in saucepan over medium-low heat. Sprinkle with pectin followed by the anise, nutmeg, lemon juice and vinegar. Once liquid starts to gather in bottom of pan, increase the heat to high and bring to a boil. Lower heat slightly and boil gently for five minutes occasionally mashing mixture. Mash in sugar, add the water and return to a boil for 1 minute. You just made jam. Cool, jar, refrigerate and enjoy within 2 weeks. Or, move to the preserving phase.
Preserving the jam:


Thoroughly wash all hardware in hot soapy water. Then pile everything (excluding the jar lids) into the pot. Cover with hot water by at least 1-inch and bring to a boil and maintain for 10 full minutes to sterilize. Turn off the heat, wait 5 minutes then add the lids (waiting will insure that the sealing compound does not melt). Leave all hardware in the pot until you're ready to can.
Remove the ladle, tongs, funnel and other tools from the pot, (careful please, it's hot in there) to a clean towel or paper towels. Using the jar tongs, remove and drain the jars, placing them on the towel/paper towel surface. (Avoid rock or metal surfaces which could result in thermal shock and breakage.)
Place the funnel in the first jar (pick it up by the ring, avoiding the sterile interior.) Use the ladle to fill each jar just to the bottom of the funnel, about 1/3-inch from the bottom of the jar threads. This "headspace" is necessary for the jars to seal during processing.
Wipe the jar rims with a moist paper towel, checking for any cracks or irregularities as you go. Use the magnetized device of your choice to position lids on each jar. Screw the rings on finger tight. (Remember, the rings don't seal the jars they only hold the lids in place. Heat will drive out the headspace air, which when cooled will create a vacuum, thus sealing the jars)
Return the jars to the pot being certain that they don't touch the bottom of the pot or each other. (If you don't have a jar rack, try a round cake rack, or metal mesh basket. Even a folded kitchen towel on the pot bottom will do in a pinch.) Add additional water if necessary to cover the jars by at least an inch, and bring to a hard boil over high heat according to the table below. (Be sure not to start your timer until a true boil is reached. The headroom air may bubble out of the jars before a boil is reached. Don't be fooled.)


Here is the handy dandy link to that video. Part 1 is linked but just look next to the video on YouTube. (I think we all know how that works =]) Part 2 should be linked. This is thanks to Mr. Alton Brown, which on this topic I think is very effective at explaining. Video

Processing times: Within 1,000 feet of sea level: 5 minutes
1,000 -- 3,000 feet above sea level: 10 minutes
3,001- 6,000 feet above sea level: 15 minutes
6,000 -- 8,000 feet above sea level: 20 minutes
Blueberry Jam 3

Saturday, August 01, 2009

Another Super Short Update

Guys, I am so sorry for not updating pretty much at all in July. See, I started an AP class online this month, plus I had summer assignments for two more AP classes, so it really started to add up. Plus, my summer has less than a month left so I am running out of time. I will try extra hard to get out a lot of posts in August so it can bumper my diminished blogging I know will happen when school starts. And I still have those posts on blueberry jam, butter cake and puff pastry, plus more!

Plus, I have been working on trying to create a logo and new layout for this blog to make it a little more streamlined, so stay tuned (is that they word? stay reading? who knows...) as that will be coming sometime.

Thank you guys so much for reading, It really does make it all worthwhile to see the view count and comments, and I appreciate it so much.